
I²C is a 2-wire protocol where a controller is communicating with one or more targets. Most often the controller is the microcontroller. Targets are sensors, eeproms or other peripheries.
This article shows our novel approach to write hardware/software integration tests for a microcontroller I²C HAL implementation. The result is an automated test for the microcontroller hardware abstraction layer.
Test objective
Our aim is to test a write function running on a RP2040 microcontroller.
#include <hardware/i2c.h>

int32_t write(uint8_t const* data, int len) {
    int bytes_written = i2c_write_blocking(i2c0, 0x40, data, len, false);
    if (bytes_written == PICO_ERROR_GENERIC) {
        return -1;
    }
    return bytes_written; // return number of bytes written
}
I²C is half-duplex, which means each transfer is either a write or a read-operation. In this case the microcontroller is trying to write len bytes to a target with address 0x40. The target could be an eeprom memory where we want to store data. To realize it, the function uses i2c_write_blocking from the pico-sdk.
What is required to test the write function?
- We need an external periphery that is responding to the write-transfer (actively acknowledge it) and record the transfer information.
- We need to flash the firmware and call write at runtime.
- We need to decide if the test passes or fails. For that we need to examine both the function result and the recorded transfer information.
Preparations
Implementing this test in an automatic way needs active external hardware. This hardware needs to acknowledge the transfer by setting the ACK-bit after each byte received. So just observing the SCL (clock) and SDA (data) pins (for example with a Logic Analyzer) is not sufficient.
The ExecutionPlatform test device supports an I²C Endpoint that we can use to prepare and run this test.
To prepare the test we need to tell the ExecutionPlatform that it should create an I²C Endpoint at the microcontroller pins. Our example code above uses I2C0 from the RP2040, which is located at package pins 2 and 3. With this information we create a configuration:
I2C_TARGET:
    I2C0:
        SDA: 2
        SCL: 3

Analyzer:
    Digital:
        0: SYSTEM.TEST_RUNNING
        1: I2C0.SDA
        2: I2C0.SCL
Configuring the Analyzer Endpoint will allow us to graphically inspect the pin signals later.
Writing the first test
The first test is straight-forward. We use the Code Interface to flash the firmware with our write function. Before we invoke this function, we start the I2C Endpoint configured above. From this moment the ExecutionPlatform will start monitoring all activity on the bus. We instruct it to acknowledge all transfers that happen on address 0x40.
*** Settings ***
Library ${ep_app_dir}/EP.py ${ep_url} ${ep_bsp_dir}/i2c.ep-config
Suite Setup DUT Flash Firmware ${ep_binary_dir}/example/example_endpoint_i2c_write.bin
*** Test Cases ***
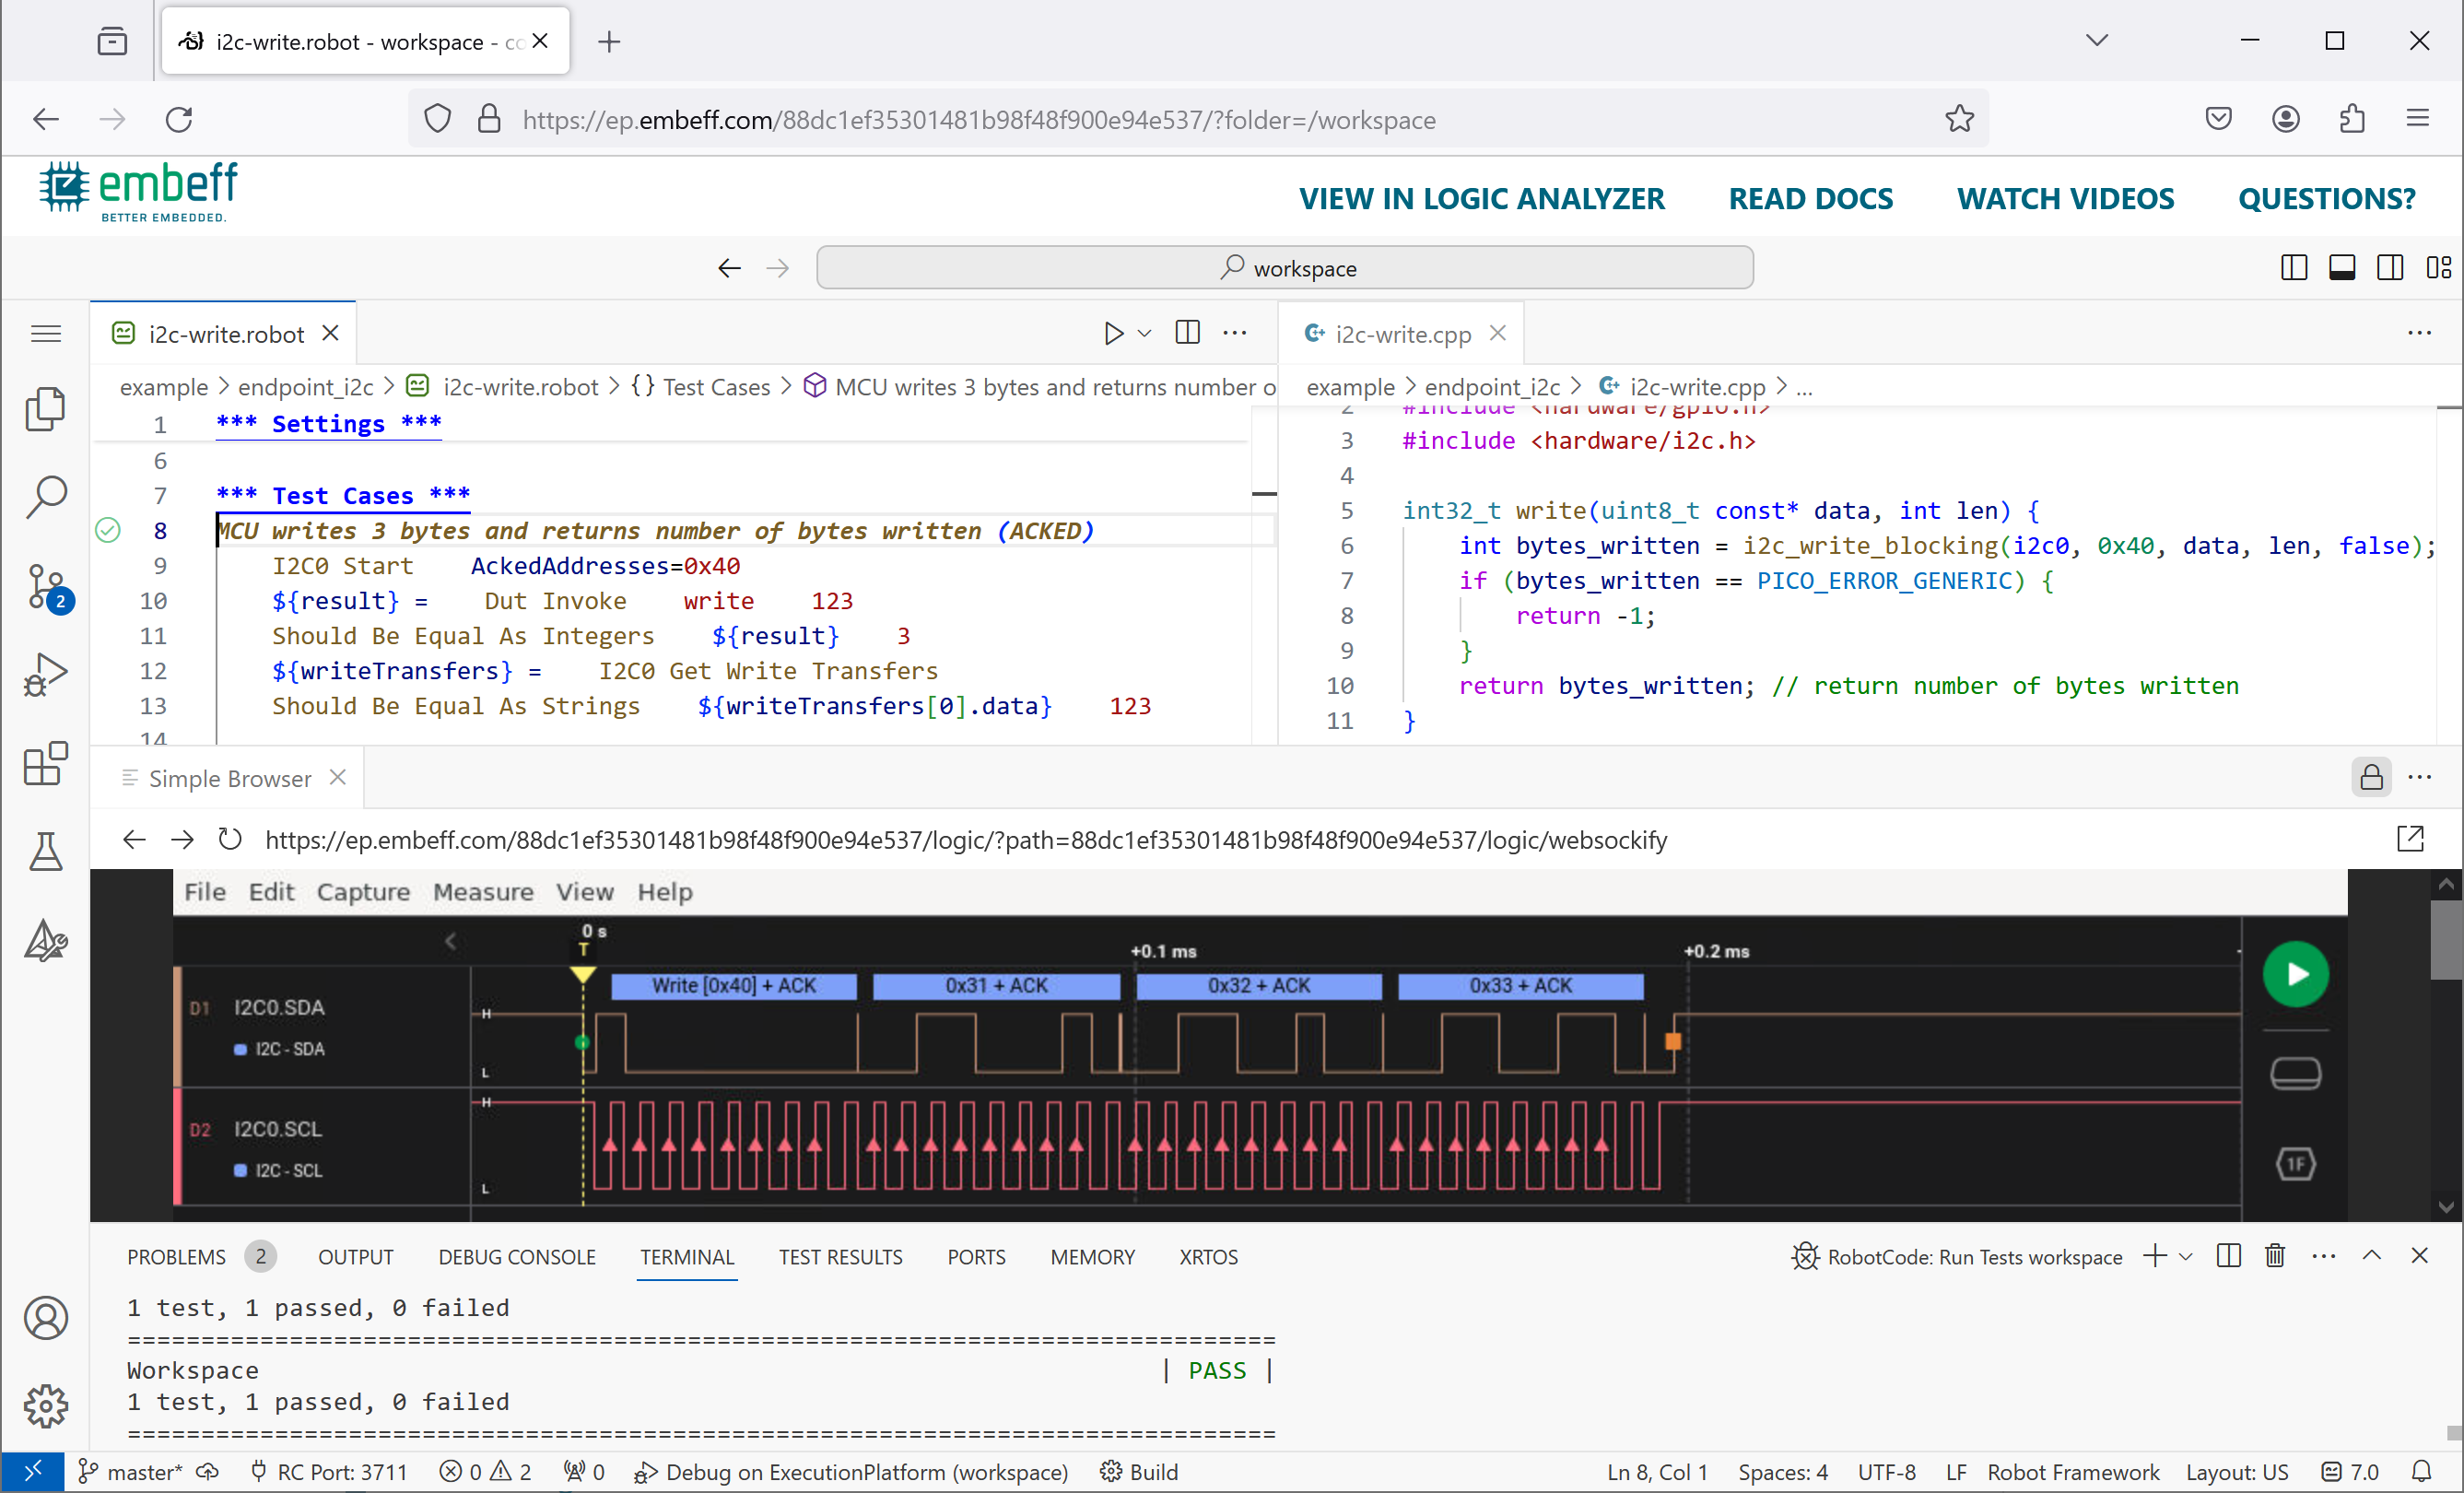
MCU writes 3 bytes and returns number of bytes written (ACKED)
I2C0 Start AckedAddresses=0x40
Dut Invoke write 123
${writeTransfers} = I2C0 Get Write Transfers
Should Be Equal As Strings ${writeTransfers[0].data} 123
The first test invokes write with dummy data (“123”). We then use the I2C-Endpoint to inspect the recorded write transfers and whether the first transfer and contains our dummy data.
Test error scenarios
Let us create a second test case that makes sure that our error handling also works.
*** Test Cases ***
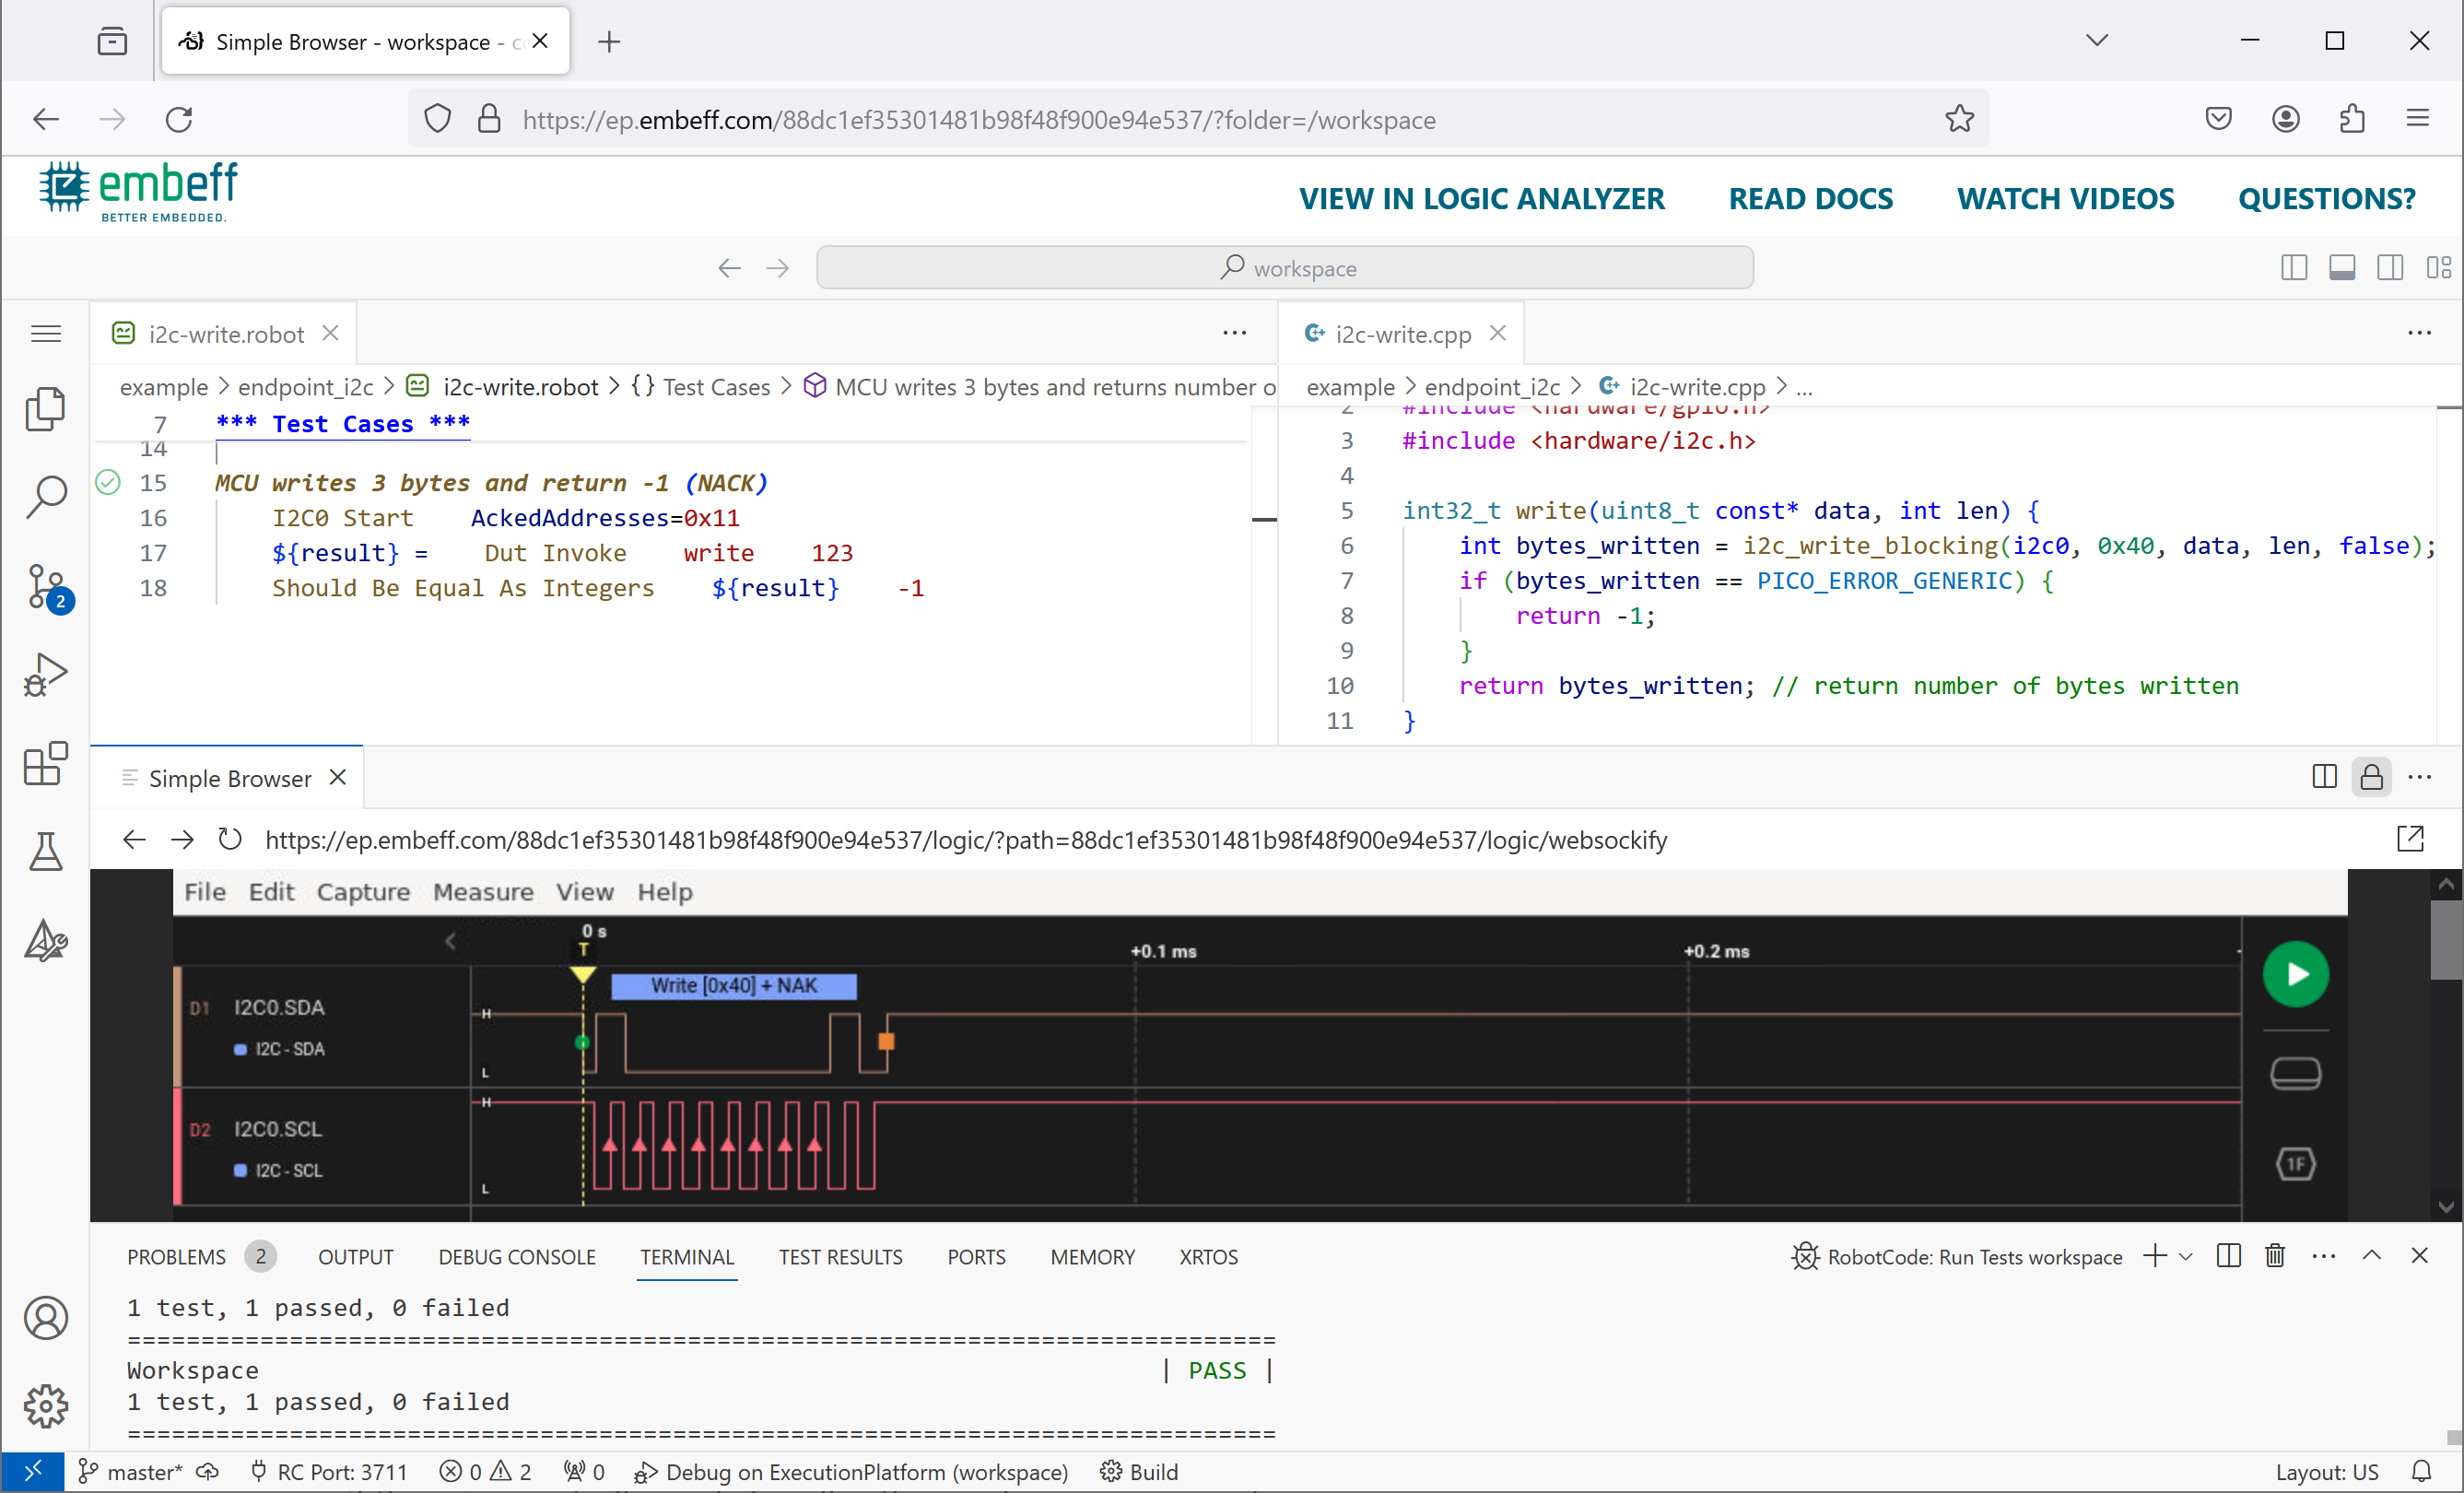
MCU writes 3 bytes and return -1 (NACK)
I2C0 Start AckedAddresses=@{EMPTY}
I2C0 Disable Automatic Strict Mode Check
${result} = Dut Invoke write 123
Should Be Equal As Integers ${result} -1
This time, we tell the I2C Endpoint in the Start keyword that it should not acknowledge any address. When the MCU tries to again write 3 bytes, it should notice the missing acknowledge (called “NACK”) and stop sending data. To ensure that the function properly detects this problem, we assert that its return code is -1.
What next?
We saw two example tests for a fairly simple piece of code. For many scenarios the code under test will be more complex. It could for example involve chip features like DMA. The I2C-Endpoint provides different keywords to test such code in-detail. You can also create error bus scenarios (like an Arbitration Loss) and see if the microcontroller code handles these edge cases properly.
You can try everything described in this article by yourself. Just start a demo in your browser. The code above is located in example/endpoint_i2c.